Source Connector for Teradata
This guide describes how to configure digna to connect to Teradata over ODBC, using a DSN-less connection string.
The digna side of the setup is the same for every technology — where connections are created, how property values are encrypted, how a connection is tested and what the profiling modes mean. It is described in Database Connections Overview. This page covers what is specific to Teradata.
1. Install the ODBC Driver
Install the ODBC Driver for Teradata on the machine that runs the digna backend, following the vendor's official installation guide.
The driver registers itself with its version in the name, for example Teradata Database ODBC Driver 20.00. Read the exact registered name off your host as described in Install the ODBC Driver on the digna Host.
2. ODBC Properties
An example, not a specification
The set below is one combination that is known to work. The properties belong to the Teradata ODBC driver, so their names, defaults and accepted values differ between driver versions — the version is part of the driver name itself — and between platforms. Use this as a starting point and check the documentation of the driver version you installed.
Add the following properties in the Add DB Connection screen:
| Key | Example value | Notes |
|---|---|---|
DRIVER | Teradata Database ODBC Driver 20.00 | Must match the driver name registered on the digna host |
DBCNAME | teradata.example.com | Server name or IP address. Teradata's own name for the host property |
UID | digna_source_user | Database user |
PWD | <password> | Tick Encrypted |
The resulting connection string looks like this:
DRIVER=Teradata Database ODBC Driver 20.00;DBCNAME=teradata.example.com;UID=digna_source_user;PWD=<password>
Useful additional properties:
| Key | Example value | Notes |
|---|---|---|
MechanismName | TD2 | Logon mechanism. TD2 is the Teradata default; use LDAP for directory authentication |
DefaultDatabase | dad | Database the session starts in |
CharacterSet | UTF8 | Set this where the default session character set would mangle non-ASCII data |
3. digna Configuration
In the Add DB Connection screen, provide the following:
Name:               Name of the connection. This is used for referencing the connection in other screens.
Technology:         Teradata
Profiling Mode:     Standard, Permanent or Session
Work Schema:        Database for the work tables of "Permanent" profiling, e.g. "Digna_Work"
4. Notes on Teradata
- A Teradata database is a catalog, not a schema. digna lists the databases the user may see (from
DBC.DatabasesV) as catalogs, and the schema level does not apply. When you add a data source, pick the database as the catalog; the schema is reported as not applicable. - One connection reaches every permitted database, so a single connection can serve sources across databases — unlike the technologies where the connection is pinned to one database.
- Work Schema is a database. For Permanent profiling, name the Teradata database that holds the work tables, and give the user
CREATE TABLErights plus aPERMspace allocation in it — a database with zero perm space cannot hold a table. - Profiling modes. Permanent creates tables in Work Schema. Session uses a
VOLATILEtable, which needsSPOOLspace but no perm space and no rights in Work Schema. Standard needs read access only.
5. Verifying the Driver (optional)
Configuring an ODBC data source is not required for a DSN-less connection, but the driver's own dialog is a convenient way to confirm that the driver and your credentials work before you enter them in digna.
Step 1
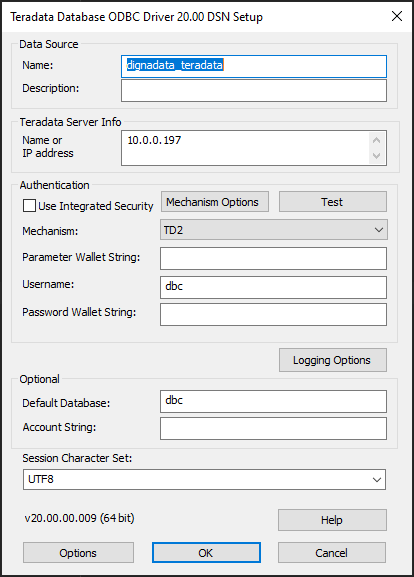
The Name or IP address field here is the DBCNAME property in section 2.
Click the Test button.
Step 2
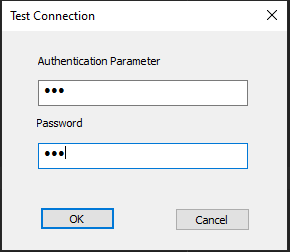
Provide username and password, then click the OK button. A success screen confirms that the driver and the credentials work.